Introduction
One will discover how to replace a bidet seat gasket and eliminate leaks in this comprehensive guide. The process saves money, prevents water damage, and restores the comfort of a functional bidet. The instructions are written for an intermediate DIY enthusiast who already possesses basic plumbing knowledge. By following each step, one will achieve a reliable seal without requiring professional assistance.
What You’ll Need
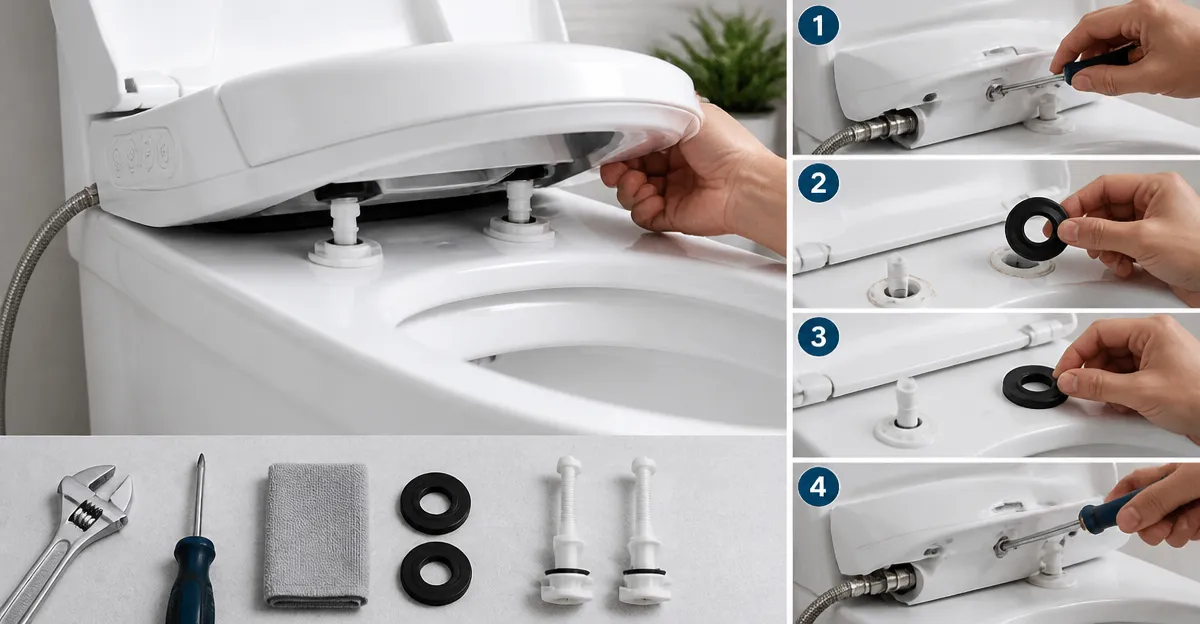
- Adjustable wrench or slip‑joint pliers
- Flat‑head screwdriver
- Bucket or towel to catch residual water
- Replacement gasket (compatible with most non‑electric bidet seats)
- Plumber’s Teflon tape
- Brondell EcoSeat – useful if the existing seat is damaged beyond the gasket.
- LUXE Bidet NEO 120 – provides a reference installation kit with high‑quality hoses.
- Clirass Elongated Bidet Seat – an alternative seat if a full replacement is preferred.
- Shineforu Ultra‑Slim Bidet – a compact attachment that can be installed after the gasket is fixed.
Step 1: Shut Off the Water Supply
One must locate the shut‑off valve behind the toilet and turn it clockwise until it stops. If the valve is difficult to access, one can also turn off the main water supply for the house. Open the toilet flush lever to relieve any remaining pressure in the line. Place a bucket beneath the tank to catch any water that may escape when the hose is disconnected.
Step 2: Disconnect the Water Line
Using the adjustable wrench, loosen the nut that connects the water supply hose to the bidet seat inlet. Turn the nut counter‑clockwise while supporting the hose to avoid sudden release. Once the connection is free, lower the hose into the bucket. This step prevents water from spilling onto the floor during gasket removal.
Step 3: Remove the Seat from the Toilet Bowl
Locate the mounting bolts that secure the bidet seat to the toilet bowl. Use a flat‑head screwdriver to unscrew the bolts, keeping them in a safe place for reassembly. Gently lift the seat away from the bowl; the gasket will be visible at the base of the seat where it contacts the porcelain.
Step 4: Inspect and Remove the Old Gasket
Examine the existing gasket for cracks, deformation, or mineral buildup. A compromised gasket is the most common source of leaks. Pull the gasket away from the seat mounting plate; if it adheres, use a plastic scraper to avoid scratching the surface. Clean the mounting area with a soft cloth and mild detergent to ensure a clean surface for the new gasket.
Step 5: Install the New Gasket
Position the replacement gasket evenly around the seat mounting plate, ensuring that the lip sits flush against the porcelain. Press the gasket firmly to create a uniform seal. For added security, wrap plumber’s Teflon tape around the threads of the water inlet before reattaching the hose; this reduces the chance of future leaks at the connection point.
Step 6: Reassemble the Seat and Test for Leaks
Replace the bidet seat onto the toilet bowl and align the mounting holes with the bolts. Tighten the bolts evenly, alternating sides to maintain balance. Reconnect the water supply hose and hand‑tighten the nut before using the wrench for a final snug fit. Turn the water supply valve counter‑clockwise to restore flow and observe the joint for any signs of dripping. Activate the bidet function to confirm that water flows through the nozzle without escaping from the gasket area.
Step 7: Consider a Seat Upgrade if Problems Persist
If leaks continue after a new gasket is installed, one may have a cracked seat or worn internal seals. In such cases, replacing the entire seat is advisable. The Brondell EcoSeat offers a non‑electric solution with dual nozzles, ambient water temperature, and a price of $89.98. Its 4.3‑star rating from 9,268 reviews indicates reliable performance. Alternatively, the Clirass Elongated Bidet Seat provides a quiet‑close feature and adjustable water pressure for $79.99, rated 4.6 stars by 1,504 reviewers. Both models are designed for easy installation, reducing future maintenance concerns.
Tips & Pro Tips
- Always use Teflon tape on threaded connections to prevent micro‑leaks.
- When tightening bolts, apply no more than ¼ turn past hand‑tight to avoid cracking the porcelain.
- Check the water pressure setting after reassembly; excessive pressure can wear the gasket prematurely.
- If the bidet seat includes a hot‑water option, verify that the hot‑water line is properly insulated to prevent condensation.
- Keep a small spare gasket on hand; they are inexpensive and can save time during future maintenance.
Troubleshooting
Leak at the water inlet after reassembly: Ensure the nut is tightened securely and that Teflon tape is applied correctly. Replace the washer if it appears deformed.
Continuous drip from the base of the seat: The gasket may not be seated evenly. Remove the seat, reposition the gasket, and verify that no debris remains on the sealing surface.
No water flow through the nozzle: Verify that the water supply valve is fully open and that the hose is not kinked. Inspect the internal valve of the bidet seat for blockage.
Conclusion
One has learned how to replace a bidet seat gasket, stop leaks, and evaluate whether a full seat replacement is necessary. By following the step‑by‑step instructions, one can maintain a hygienic bathroom environment while avoiding costly plumber visits. The recommended products provide reliable tools and alternatives that enhance the overall experience. Take confidence in applying these skills to future plumbing tasks and enjoy the comfort of a leak‑free bidet.
Products Mentioned in This Guide
Frequently Asked Questions
What tools are required to replace a bidet seat gasket?
You need an adjustable wrench or slip‑joint pliers, a flat‑head screwdriver, a bucket or towel, the replacement gasket, and plumber’s Teflon tape.
How can I tell if my bidet seat gasket needs to be replaced?
Visible water leakage around the seat base or a worn, cracked gasket are clear signs it should be swapped out.
Do I need to shut off the water supply before removing the old gasket?
Yes, turn off the toilet’s water valve and place a bucket or towel to catch any residual water.
Can I use any replacement gasket, or must it match my bidet model?
Choose a gasket that’s compatible with most non‑electric bidet seats, or verify the size with the manufacturer’s specifications.
When should I consider replacing the entire bidet seat instead of just the gasket?
If the seat is cracked, corroded, or the mounting hardware is damaged, replacing the whole seat (e.g., Brondell EcoSeat) is more cost‑effective.