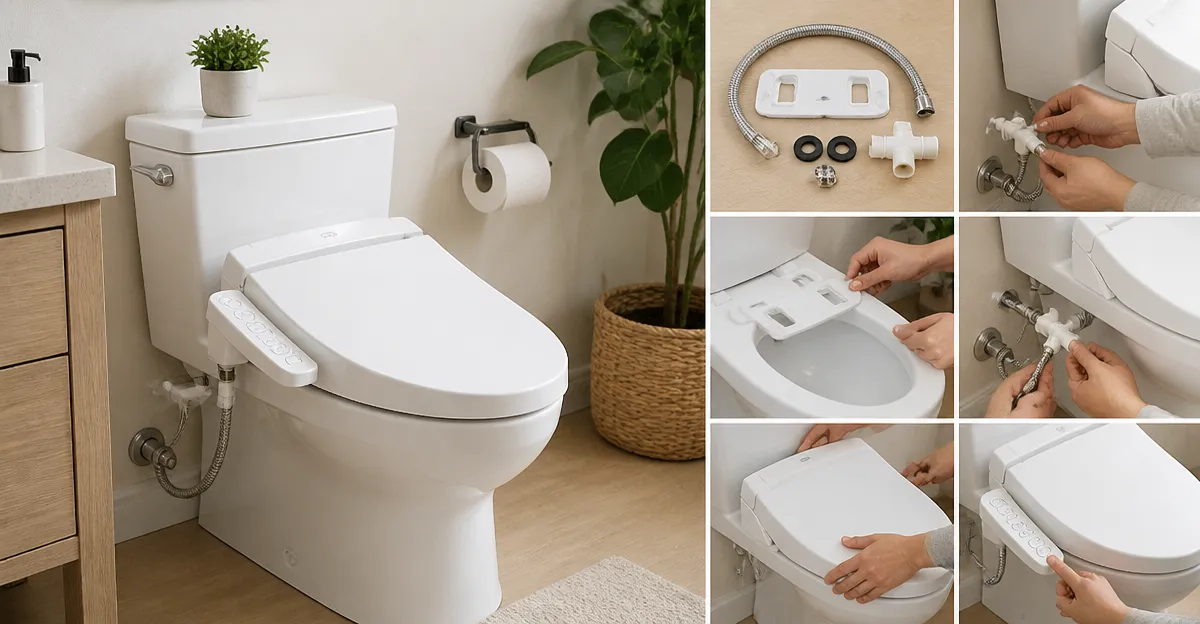
How to Install a Bidet Seat in a Rental Apartment: No‑Drill, Step‑by‑Step Guide for Renters
Introduction
Renters often hesitate to upgrade bathroom hygiene because traditional installations appear to require permanent modifications. This guide explains how to install a bidet seat without drilling, preserving the integrity of the rental unit while providing a modern, eco‑friendly cleaning solution. Readers will learn the necessary tools, the exact sequence of actions, and how to avoid common pitfalls. By the end of this article, one will be able to complete the installation in under an hour, maintain compliance with lease agreements, and enjoy the comfort of a fresh, water‑based cleanse.
What You Will Need
- A non‑electric bidet seat or attachment (see product recommendations below)
- Adjustable wrench (typically 7/8 inch)
- Flat‑head screwdriver
- Teflon (PTFE) tape – a small roll is sufficient
- Bucket or shallow pan to catch residual water
- Optional: a universal T‑adapter with shut‑off valve for pressure control
All of these items are commonly found in a basic toolkit, and the bidet seat itself includes most required hardware. The following sections integrate specific products that simplify each step.
Step‑by‑Step Instructions
1. Verify Compatibility and Measure the Toilet
Before purchasing any bidet, confirm that the toilet is an elongated model, as most non‑electric seats are designed for that shape. Measure the distance between the bolt holes (approximately 13–14 inches) and the overall length of the bowl. The Brondell EcoSeat Bidet Seat fits elongated toilets and includes a textured chrome dial for easy adjustments. It costs $89.98, holds a 4.2‑star rating from over nine thousand reviews, and requires no electricity, making it ideal for rentals that lack a nearby outlet.
Why this product matters: The EcoSeat’s non‑electric design eliminates the need for a power source, a common limitation in rental bathrooms. Its dual‑nozzle system provides both rear and front washes, offering comprehensive hygiene without additional accessories.
2. Gather Tools and Prepare the Work Area
Place a bucket or a shallow pan on the floor to catch water that may spill when the supply line is disconnected. Have the adjustable wrench, screwdriver, and a roll of Teflon tape within reach. If the existing water supply valve is difficult to turn, a universal T‑adapter with a shut‑off valve, such as the one recommended for the LUXE Neo 120, can provide finer pressure control and prevent accidental flooding.
Why this product matters: The LUXE Neo 120 includes a high‑pressure valve with metal‑ceramic cores, ensuring reliable water flow. Although the Neo 120 is an attachment rather than a seat, the same adapter can be used with any bidet that connects to the toilet’s water line, offering renters a versatile tool for pressure regulation.
3. Turn Off the Water Supply
Locate the shut‑off valve on the wall behind the toilet and turn it clockwise until it stops. Open the toilet tank to release any remaining pressure, then flush to empty the bowl. Use the bucket to catch any water that drips from the supply hose.
This precaution protects both the renter and the property from water damage, a concern that landlords often emphasize in lease agreements.
4. Remove the Existing Toilet Seat
Using the adjustable wrench, loosen the nuts securing the current seat bolts. Remove the seat and set it aside. Keep the bolts; they will be reused for the new bidet seat, avoiding the need for drilling new holes.
If the bolts are corroded, a small amount of penetrating oil can be applied and allowed to sit for five minutes before attempting removal again.
5. Install the Bidet Seat Base
Place the bidet seat base onto the toilet bowl, aligning the bolt holes with the existing holes. Insert the retained bolts and hand‑tighten them, then finish tightening with the wrench. Ensure the seat sits level; an uneven seat can cause leaks or discomfort.
For the Clirass Bidet Seat, the slow‑close lid adds a quiet, premium feel, and the reinforced brass inlet provides leak‑resistant performance. Priced at $79.98 with a 4.6‑star rating from three hundred twenty‑nine reviews, this model offers a sleek profile that blends with modern bathroom décor.
6. Connect the Water Supply Hose
Attach the bidet’s water‑supply hose to the T‑valve that was removed from the toilet’s fill valve. Wrap the threaded connections with Teflon tape to create a watertight seal. Tighten the connections with the wrench, being careful not to overtighten, which could strip the threads.
If the hose length is excessive, as some users note with the BIGCOW Ultra‑Slim Bidet Attachment, trim it carefully with scissors, leaving at least two inches of slack to avoid tension on the joint. The BIGCOW model costs $24.99, carries a 4.4‑star rating, and its ultra‑thin design ensures it does not interfere with the seat’s clearance.
7. Test for Leaks and Adjust Pressure
Turn the water supply valve counter‑clockwise to restore flow. Observe the connections for any drips. If a leak appears, tighten the fitting a quarter turn and re‑apply Teflon tape if necessary. Once the system is dry, use the bidet’s pressure knob to find a comfortable setting. Begin with the lowest setting and increase gradually.
The WATERLACE Ultra‑Slim Bidet Attachment offers an adjustable knob that provides precise control, making it easy for renters to customize the spray without risking excessive force. Priced at $29.99 with a 4.4‑star rating, it is an economical choice for those who prefer a minimalist, non‑electric solution.
8. Secure the Seat and Finish Installation
Ensure the bidet seat is fully seated and the lid closes smoothly. Tighten any remaining hardware, then replace the toilet seat cover if applicable. Verify that the control knob is firmly in the “off” position before the first use.
Because no drilling was required, the rental unit remains unchanged, and the installation can be reversed easily should the tenant move out.
Tips & Pro Tips
- Always use the supplied Teflon tape; it is the simplest method to prevent leaks without permanent modifications.
- If the water pressure is too high, install a cheap inline regulator (approximately $5) to reduce flow and avoid uncomfortable splashes.
- Place a small rubber mat under the bidet hose to protect the porcelain from scratches during installation.
- For renters with limited space, choose an ultra‑slim attachment such as the BIGCOW or WATERLACE models; their thin profiles maintain a seamless look.
- Document the installation with photos before and after; this can be useful when returning the security deposit.
Troubleshooting
| Problem | Possible Cause | Solution |
|---|---|---|
| No water flow | Supply valve closed or hose kinked | Open the valve fully and straighten the hose. |
| Leaking at the T‑valve | Insufficient Teflon tape or over‑tightening | Remove the fitting, re‑apply tape, and tighten gently. |
| Excessive spray pressure | High municipal water pressure | Install an inline pressure regulator or adjust the bidet’s knob to the lowest setting. |
| Seat does not close properly | Misaligned bolts or uneven floor | Loosen bolts, level the seat, then retighten. |
Conclusion
Installing a bidet seat in a rental apartment does not require drilling, permanent fixtures, or professional plumbing. By following the steps outlined above, renters can achieve a hygienic, eco‑friendly bathroom upgrade while preserving the condition of the property. The recommended products—Brondell EcoSeat, LUXE Neo 120, Clirass Bidet Seat, BIGCOW Ultra‑Slim Attachment, and WATERLACE Ultra‑Slim Attachment—provide reliable performance, easy installation, and respectable customer satisfaction. With careful preparation and attention to detail, the installation can be completed in under an hour, delivering immediate benefits in comfort, cleanliness, and reduced toilet‑paper consumption.
Products Mentioned in This Guide
Frequently Asked Questions
Can I install a bidet seat in a rental bathroom without drilling?
Yes, most non‑electric bidet seats attach to the existing toilet bowl using the standard mounting bolts, so no permanent holes are required.
Will a no‑drill bidet installation violate my lease agreement?
No, because it uses the existing fixtures and can be removed without damage, keeping you compliant with typical lease terms.
What basic tools do I need for a drill‑free bidet seat installation?
An adjustable wrench (7/8 in), a flat‑head screwdriver, Teflon tape, and a bucket or pan to catch water are sufficient.
How do I connect the bidet seat to the water supply without a T‑adapter?
Simply unscrew the toilet’s supply hose, attach the bidet’s hose, and tighten with Teflon‑wrapped threads; a universal T‑adapter is optional for shut‑off control.
Can I remove the bidet seat and restore the toilet to its original condition when I move out?
Yes, detach the bidet, re‑attach the original supply hose, and replace any washers; the toilet will be as it was before installation.