Introduction
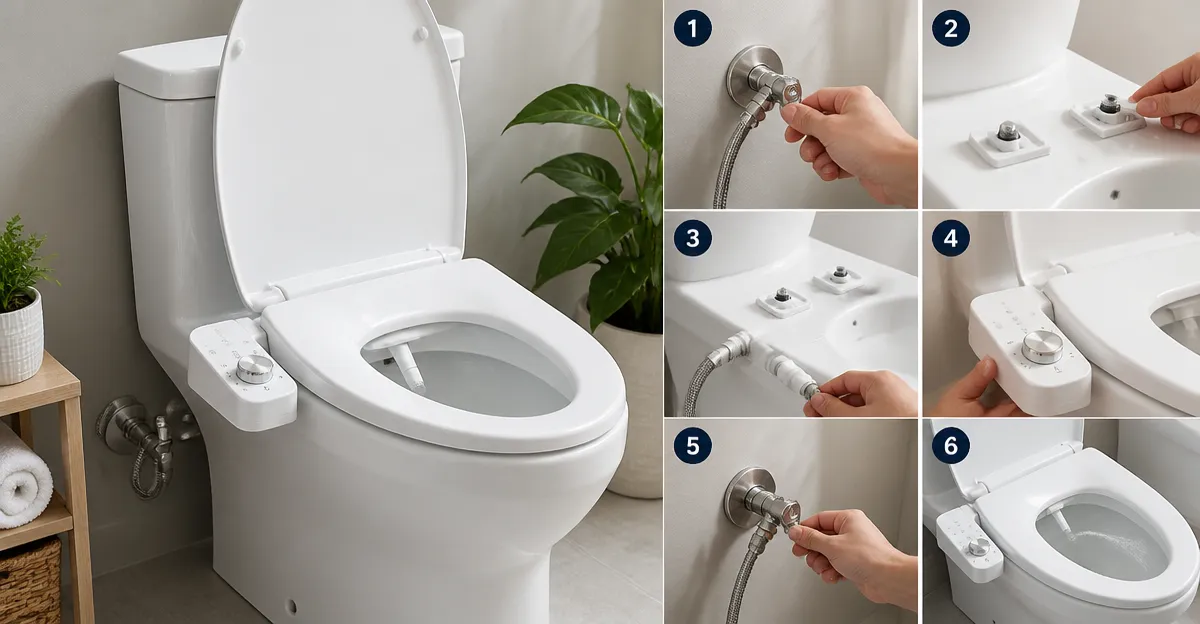
This guide explains how to install a bidet seat that does not require an electrical outlet, allowing anyone to upgrade their bathroom without calling a plumber or electrician. Readers will learn how to turn off water, remove the existing seat, attach the necessary T‑adapter, mount the new bidet, and perform final adjustments. The process is designed for homeowners with basic DIY skills and can be completed in under an hour. By following these instructions, one can enjoy a cleaner, greener bathroom while saving on toilet‑paper costs.
What You'll Need
- Adjustable wrench or pliers
- T‑adapter with shut‑off valve (included with most bidet seats)
- Flexible water hose (often supplied with the bidet)
- Thread seal tape (Teflon tape)
- Screwdriver set
- Soft cloth for cleaning
- Optional: Brondell Swash Ecoseat – a non‑electric bidet seat that fits elongated toilets
- Optional: LUXE Neo 120 – a budget‑friendly bidet attachment
- Optional: Clirass Elongated Bidet Seat – a dual‑nozzle seat with soft‑close lid
- Optional: Shineforu Dual Mode Bidet Attachment – an ultra‑slim attachment for tight spaces
Step‑by‑Step Instructions
1. Shut Off the Water Supply
Locate the shut‑off valve on the wall behind the toilet and turn it clockwise until it stops. Open the toilet flush lever to release any remaining water in the tank, which reduces pressure in the supply line. Use a soft cloth to wipe away any drips that may appear on the floor. This step prevents accidental flooding during the removal of the existing seat.
2. Remove the Existing Toilet Seat
Locate the bolts that secure the current seat to the bowl; they are usually hidden beneath plastic caps. Use a screwdriver or an adjustable wrench to loosen and remove the bolts, then lift the seat away. Clean the exposed rim of the bowl with a cloth to ensure a clean surface for the new bidet seat. If the old seat had a built‑in water line, disconnect it carefully, noting the orientation for later reference.
3. Install the T‑Adapter (Shut‑Off Valve)
Most non‑electric bidet seats, such as the Brondell Swash Ecoseat, include a T‑adapter that splits the water flow to the toilet tank and the bidet nozzle. Wrap the threads of the T‑adapter with Teflon tape to create a watertight seal, then screw it onto the existing water supply line. Tighten the connection with a wrench, being careful not to overtighten and damage the threads. The shut‑off valve on the adapter allows you to isolate the bidet later for maintenance without shutting down the entire toilet.
The LUXE Neo 120 also provides a T‑adapter; its high‑pressure metal‑ceramic core ensures consistent water flow, which is especially useful in homes with low water pressure.
4. Mount the New Bidet Seat or Attachment
Place the bidet seat frame onto the bowl, aligning the mounting holes with the bolt holes. For the Clirass Elongated Bidet Seat, the adjustable brackets allow precise positioning, ensuring the nozzle aligns with the user’s comfort zone. Insert the provided bolts through the seat’s mounting holes and tighten them securely with a screwdriver. The soft‑close hinge on the Clirass model prevents slamming, extending the life of the lid.
If you prefer a slimmer solution, the Shineforu Dual Mode Bidet Attachment mounts directly onto the existing seat, requiring only a few screws and the supplied T‑adapter. Its ultra‑thin profile fits most toilet shapes without creating a noticeable gap.
5. Connect the Water Hose
Attach the flexible hose that came with your bidet to the outlet on the T‑adapter, then connect the other end to the bidet’s inlet. Ensure the hose is not twisted and that the connections are tightened with the wrench. For the Brondell model, the hose is stainless steel, offering durability and resistance to kinking. Verify that the hose length is sufficient for your toilet’s layout; the Brondell seat measures 20.03" x 14.39" x 2.55" and typically includes a hose of appropriate length.
Check the LUXE Neo 120’s hose for any leaks by briefly turning on the water and observing the connections. The product’s metal‑ceramic valves reduce the likelihood of drips, which is why many users praise its leak‑free performance.
6. Test the Bidet Functions and Adjust Settings
Turn the water supply back on slowly, watching for any signs of leakage at the T‑adapter and hose connections. Once the water is flowing, sit on the bidet and activate the control dial. The Brondell Swash Ecoseat offers dual nozzles for rear and front washes, with adjustable pressure; start with a low setting and increase gradually for comfort. The Clirass seat provides a similar dual‑nozzle system, and its self‑cleaning mode rinses the nozzles before and after each use, ensuring hygiene.
If you installed the Shineforu attachment, adjust the water‑pressure knob to a comfortable level; the design allows precise control, which is valuable for users with sensitive skin. Verify that the soft‑close lid functions correctly by gently lowering it; it should close silently without slamming.
Tips & Pro Tips
- Always use Teflon tape on threaded connections to prevent leaks.
- If the hose is too long, secure excess length with a zip tie to avoid it rubbing against the porcelain.
- For homes with cold water only, consider a portable heater for the bathroom to improve comfort during winter months.
- Run a short test cycle before first use to clear any debris that may have entered the nozzle during shipping.
- Keep the control knob clean with a soft cloth; excessive moisture can cause corrosion over time.
Troubleshooting
Leak at the T‑adapter: Shut off the water, remove the adapter, and re‑apply Teflon tape. Tighten the connection a quarter turn further, but avoid over‑tightening.
No water from the nozzle: Ensure the hose is fully seated on both ends and that the shut‑off valve on the adapter is open. Check the pressure dial; some models require the top dial to be turned on while the bottom dial controls cleaning cycles.
Weak water pressure: Verify that the home’s main water pressure is adequate; if it is low, consider installing a small pressure‑boosting valve before the T‑adapter.
Conclusion
By following this step‑by‑step guide, one can successfully install a non‑electric bidet seat without the need for an electrical outlet or professional plumber. The process enhances personal hygiene, reduces toilet‑paper consumption, and adds a touch of luxury to any bathroom. Whether choosing the feature‑rich Brondell Swash Ecoseat, the budget‑friendly LUXE Neo 120, the versatile Clirass Elongated Bidet Seat, or the ultra‑slim Shineforu attachment, the tools and techniques remain the same. Embrace the clean, green benefits of a bidet today.
Products Mentioned in This Guide
Frequently Asked Questions
Do I need an electrical outlet to install a non‑electric bidet seat?
No, non‑electric bidet seats operate solely on water pressure and require only a T‑adapter and hose.
What basic tools are required for a DIY bidet seat installation?
An adjustable wrench or pliers, screwdriver, T‑adapter with shut‑off valve, flexible hose, and Teflon tape are sufficient.
How do I safely disconnect the existing toilet seat?
Turn off the water supply, remove the bolts holding the seat, and lift the seat off the bowl.
How is the T‑adapter installed and sealed?
Attach the T‑adapter to the shut‑off valve, wrap the threads with Teflon tape, then connect the flexible hose and bidet inlet.
What final checks should I perform after installing the bidet seat?
Turn the water back on, test the bidet for proper spray, and inspect all connections for leaks before use.